

HOW TO USE THE PATIENT PORTAL APP
Patient Portal > HOW TO USE THE PATIENT PORTAL APP
Healow is the HIPAA-secure app that allows for mobile access to your Patient Portal. It is available in both the App Store for iPhone users and Google Play for Android users.
All aspects of the Patient Portal can be accessed through Healow, including messages, referrals, health records, test results, upcoming appointments, health questionnaires, educational information, and the ability to track health data such as daily steps or blood glucose.
Through Healow, you can also do televisits, which are virtual appointments with your healthcare provider. For more information on televisits, including how to start a televisit, please click here.
A 'how to' guide for accessing the Patient Portal via Healow can be found below.

To jump to a specific section of this guide, click any of the following links:
How to view medications/request refills
How to view immunization records
To log into the Patient Portal via Healow, first make sure you have the Healow app downloaded (available here). When you first open the app, you will see the 'Get Started' screen. This is shown here:

Tapping 'Get Started' will bring you to the next page, where you will need to enter your child's first and last name, along with their date of birth. This is shown here:

After you fill in the details and tap continue, the next page will ask for a practice code. Select 'Yes, I have a Practice Code'. This is shown here:

On the next page, enter our practice code, which is BFHAAA. This is shown here:

The next page will ask you to verify your practice. Select 'This is My Practice'. This is shown here:

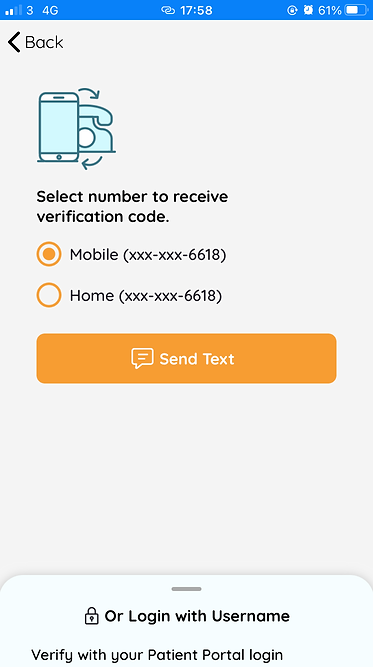
Once you have verified your practice, you will be brought to the next page. You will be asked to log in with a verification code sent to your mobile phone, or via your username and password. This is shown here:
Once you have logged in, you will need to accept the terms of use agreement. This is shown here:

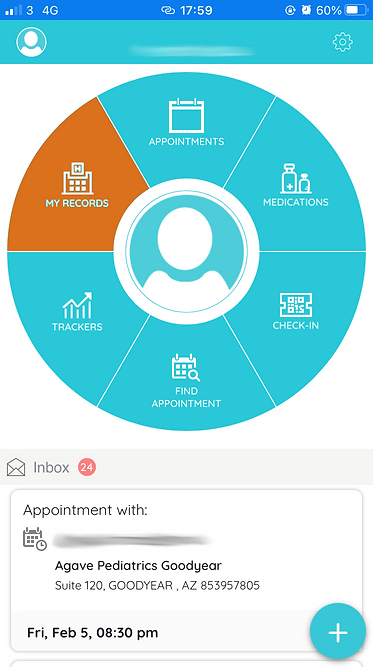
Once you have selected 'I agree to the terms & conditions', you will be brought to your dashboard. This is shown here:

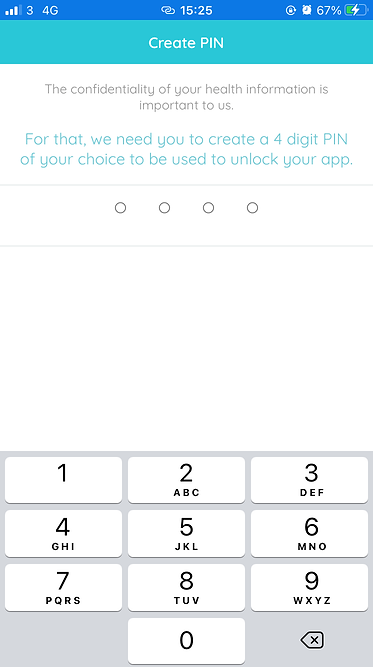
After logging in for the first time, you will be prompted to create a 4-digit PIN for the app. Save this PIN somewhere safe, as you can log in using only the PIN in the future. This screen is shown below.
To view your messages, swipe up when you are on your dashboard. Tapping the plus symbol at the bottom right corner of the screen will give you the option to compose a new message, view your inbox, or view the messages you have sent. This is highlighted here:

When you swipe up, your inbox will take up more of the screen and the dashboard circle will become smaller. You can get back to the dashboard by tapping the circle again. The inbox is shown here:

When you tap the plus symbol, the following will show up:

Tap 'Compose' if you wish to create a new message*, 'Inbox' if you wish to view your inbox, or 'Sent' if you wish to view the messages you have sent. *Please note that messages sent through the Patient Portal should be non-urgent messages only. Please call us for anything else.
When you tap 'Compose', you will be brought to a screen with the option 'General Messages'. Tap this to continue.

You will then be able to create your message. This is shown below:

To view the messages you have sent, tap the plus symbol and select 'Sent'. The sent messages screen shown below:

You can also view your messages through the records page. First, tap 'My Records' in the dashboard circle, shown here:
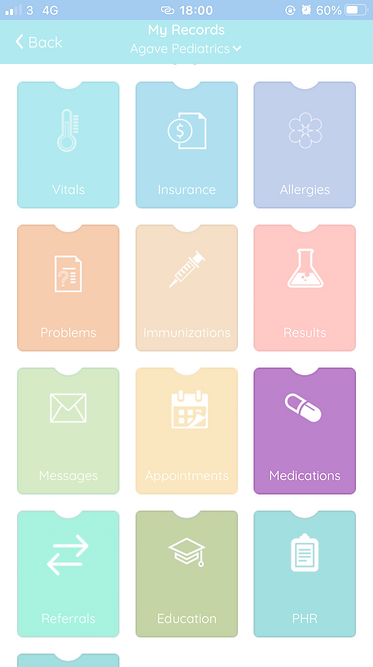
You will be brought to the records screen, which is shown below:

You can then select 'Messages', which is highlighted below:

You will then be brought to your inbox, shown below:

Selecting 'Sent' at the top will show the messages you have previously sent. To compose a new message, tap the compose symbol in the top right corner.
To view your upcoming appointments, tap 'Appointments' on the dashboard circle. This is shown here:

You will be brought to your upcoming appointments screen, which is shown below:

To view past appointments, you will need to first tap 'My Records' in the dashboard circle, which is shown below:
You will be brought to the records screen, which is shown below:
Scroll down, then tap on 'Appointments', highlighted below:

You will be brought to the visit summary page, where you can view past appointments with a summary of your visits. This is shown below:

To view your medications or request a refill, tap 'Medications' in the dashboard circle, which is shown below:

You will be brought to your medications page, shown below:

If you click the plus in the top right corner, the following will show up:

You can request a refill on medication by selecting 'Request Refill'.
If you select 'Add New Medication', you will be able to add medications to keep track of. This is for your records only, to help you keep track of your medications. This page is shown below:

You can also view your medications through the records page. First, tap 'My Records' in the dashboard circle, shown here:
You will be brought to the records screen, and will need to tap 'Medications', which is highlighted below:
You will be brought to your medications page.
Please note that the Check-In and Find Appointment sections are not currently in use. We will be updating this guide once these functionalities are being used. Thank you for your understanding!

To track aspects of your health, tap 'Trackers' in the dashboard circle, which is shown below:
You will be brought to the trackers page, where you can link devices that track health data or add data manually. To add a tracker, tap 'Add Trackers'. This is shown below:

The tracker options are shown in the bottom banner of the screen. To set up a tracker, tap 'Setup' under the picture of your device, or tap 'Setup My Device' at the bottom of the page.
Options to track 'Steps', 'Distance', and 'Calories' are shown below:

Swiping left in the bottom banner brings you to the next options, which are 'BMI', 'Sleep', and 'Heart Rate', shown below:

Swiping left in the bottom banner brings you to the next options, which are 'Blood Pressure', 'Floors', and 'Blood Glucose', shown below:

Swiping left in the bottom banner brings you to the next options, which are 'Activity' and 'Temperature', shown below:
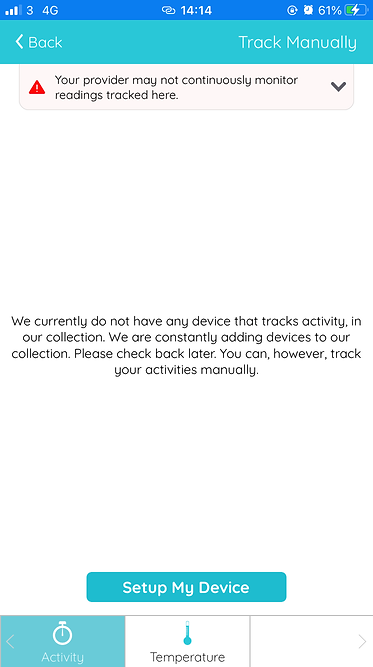
If you select 'Track Manually', at the top, the following screen will appear, asking you to confirm:

After confirming that you wish to track manually, you will be brought to the screen where you can manually enter information, shown below:

To view test results, first tap 'My Records' in the dashboard circle, which is shown below:
You will be brought to the records screen, and will need to tap 'Results', which is highlighted below:

You will be brought to the results screen, which is shown below:

Tap the name of the test to view the results.
To view diagnoses, first tap 'My Records' in the dashboard circle, which is shown below:
You will be brought to the records screen, and will need to tap 'Problems', which is highlighted below:

You will be brought to the screen where you can see previous diagnoses, which is shown below:

To view immunization records, first tap 'My Records' in the dashboard circle, which is shown below:
You will be brought to the records screen, and will need to tap 'Immunizations', which is highlighted below:

You will be brought to the immunizations screen, where you can view immunization history. This is shown below:

To view referrals, first tap 'My Records' in the dashboard circle, which is shown below:
You will be brought to the records screen, and will need to tap 'Referrals', which is highlighted below:

You will be brought to the referrals screen, where you can view referral history. This is shown below:

To view details of the referral, click on the name of the provider.
You will be brought to the detailed referral screen, shown below:

To view patient education, first tap 'My Records' in the dashboard circle, which is shown below:
You will be brought to the records screen, and will need to tap 'Education', which is highlighted below:

You will be brought to the education screen, which will show you personalized patient education based on your previous diagnoses. This is shown below:

To view a specific topic, tap the name.
To view your medical records, first tap 'My Records' in the dashboard circle, which is shown below:
You will be brought to the records screen, and will need to tap 'PHR', which is highlighted below:

You will be brought to the health records screen, and can generate medical records between a range of dates. This is shown below:

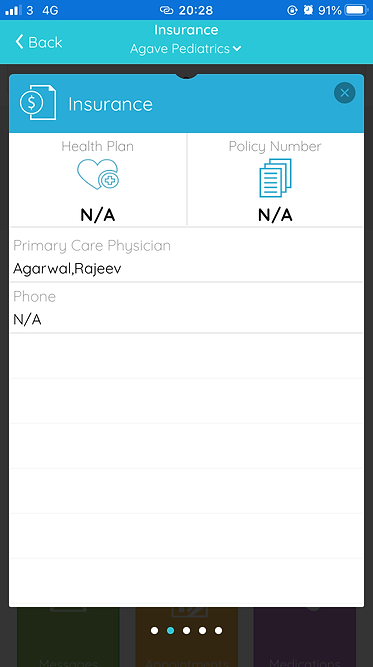
To view your insurance information, first tap 'My Records' in the dashboard circle, which is shown below:
You will be brought to the records screen, and will need to tap 'Insurance', which is highlighted below:

You will be brought to the insurance screen, which is shown below:
To view your vitals, first tap 'My Records' in the dashboard circle, which is shown below:
You will be brought to the records screen, and will need to tap 'Vitals', which is highlighted below:

You will be brought to the vitals screen, which is shown below:

To view allergies, first tap 'My Records' in the dashboard circle, which is shown below:
You will be brought to the records screen, and will need to tap 'Allergies', which is highlighted below:

You will be brought to the allergies screen, which is shown below:

To view the in-app tour, tap the gear symbol at the top right corner of the screen. This is highlighted below:

You will be brought to the settings screen, and will see options 'Take a Tour' and 'Take a Tour of Home Screen'. This is shown below:

Selecting 'Take a Tour' will give you an overview of the different things you can do through Healow.
Selecting 'Take a Tour of Home Screen' will go through different parts of the home screen. This is shown below:

If you have additional questions, please feel free to contact us.